A cracked display, fading battery or unreliable charging socket can look like a straightforward parts problem. It rarely is. The sensible route depends on confirming the fault, finding support for the exact model, checking the parts and tools available, and deciding whether you can complete the repair and its final functional tests safely.
Start with the Repair Decision, Not the Fault
Begin with a diagnosis, not a shopping basket. A visible crack may be limited to the outer glass, but it can also coincide with display, touch, sensor or frame damage. A phone that charges intermittently may have debris in the port, a worn cable or charger, battery or power-management trouble, or a damaged connector. Battery symptoms can likewise overlap with charging, software or power faults.
Your exact model matters. Manufacturer self-repair support is selective rather than universal: Samsung UK says its programme covers some products and provides genuine parts, with instructions and repair kits available for some products. Apple’s iPhone 13 manual, for example, separates troubleshooting, diagnostics, parts, tools, safety information and individual procedures. That is the level of documented route worth looking for before opening a device. Samsung Self-Repair and Apple’s iPhone 13 Repair Manual are useful examples of what to check.
Choose DIY only when the diagnosis is credible, the procedure is documented for the precise device and you can manage the safety and testing steps. A professional repairer is often the better route where the fault is unclear, the device has further damage or the repair needs skills and tools you do not have. Replacement becomes more persuasive when repair cost, expected remaining life and uncertainty outweigh the value of keeping the handset.
Screen Repairs: Visible Damage Does Not Always Mean a Simple Fix
Screen damage is easy to see, but that does not tell you which component has failed. Check whether the image is stable, touch works across the panel, the display has lines or black areas, and the phone still responds normally around the front sensors and buttons. These observations help define the problem; they do not substitute for a model-specific diagnosis.
A supported screen repair is more than a compatible-looking panel. Look for the exact model’s repair documentation, listed parts, required screws and tools, removal steps and final checks. Apple’s iPhone 13 manual illustrates this separation by including display troubleshooting, display and image issues, Multi‑Touch or Haptic Touch issues, parts, tools, repair videos and procedures. It also contains broken-glass safety information. Apple’s manual therefore shows why “replace the screen” should not be treated as a single generic task.
Before committing to DIY, make sure the chosen procedure matches your model code and the damage you can see. Stop if the frame is bent, the battery area is exposed, the device has signs of liquid damage, or the documented procedure calls for equipment you cannot use safely. An independent repairer may be better placed to assess linked damage and source the appropriate part.
After any screen repair, test more than the picture. Check the display, touch response across the whole panel, buttons, cameras, speaker and microphone, charging, network functions and any relevant sensors. The precise post-repair checks should follow the manufacturer’s documentation where it exists.
Battery Repairs: Safety and Diagnosis Matter More Than Speed
Battery work deserves a higher safety threshold than a cosmetic repair. Apple’s repair manual explicitly includes battery safety, along with battery, charging and power troubleshooting. This is a useful reminder that poor battery life, unexpected shutdowns and charging issues are not automatically proof that a replacement battery is the answer. Apple’s battery and power repair guidance places diagnosis and safety before the procedure.
Do not treat a swollen, punctured, hot or visibly damaged battery as an ordinary DIY job. Stop using the device if it appears unsafe, avoid pressing or piercing the battery, and seek professional help. A repair can also become unsuitable if access requires significant disassembly, adhesives or tools outside the documented route.
If you are considering a supported battery replacement, verify four things first: that the symptom has been assessed; that the exact device has a documented procedure; that a genuine or manufacturer-approved compatible part is available; and that you understand the final checks. Samsung UK says genuine spare parts can be bought through its Self-Repair programme for some Samsung products, while parts, instructions and repair kits vary by product. Samsung’s programme page is the starting point, not evidence that every Galaxy model has the same route.
Professional repair is the prudent choice when the battery condition is uncertain, the device has been dropped or exposed to liquid, the procedure is unsupported for the model, or you cannot complete the repair and verify normal charging and power behaviour afterwards. The aim is not the fastest swap; it is a safe, diagnosable repair with a credible outcome.
Charging-Port Repairs: Diagnose the Cause Before Replacing Parts
A phone that will not charge does not necessarily have a failed charging port. Start with simple, low-risk checks: try a known-good cable and power source, inspect for obvious debris without forcing tools into the connector, and observe whether charging is intermittent, absent or accompanied by other power symptoms. Software, battery and internal power faults can resemble a port problem.
Apple’s iPhone 13 manual groups wired charging and power issues under battery, charging and power, alongside diagnostics and troubleshooting. That structure matters: it treats charging as a system to investigate, rather than assuming the connector is the faulty part. Apple’s iPhone repair documentation also lists separate parts, tools and procedures, showing why a generic online video may not match a particular handset.
A charging-port repair can involve deeper disassembly than cleaning a connector. Before buying a part, confirm the exact model, the documented repair path, the necessary tools and the tests you will run afterwards. Samsung UK provides a self-repair charging-port video among its support materials, but says its programme applies to some products; availability and instructions must be checked for the individual device. Samsung Self-Repair is therefore a verification step, not a blanket approval.
Escalate to a professional when cleaning and known-good accessories do not resolve the issue, when the device has liquid or impact damage, or when the diagnosis points beyond a simple documented port repair. After repair, test stable wired charging, data transfer where relevant, battery behaviour and the functions disturbed during disassembly.
Check Parts, Tools, Instructions and Post-Repair Tests
Before opening the phone, build a short evidence file for the exact model:
- Identify the full model code, not just the product family.
- Find a manufacturer manual or other model-specific step-by-step guide.
- Confirm that the replacement part is appropriate for that model and repair.
- List every required tool, fixture, adhesive or safety item before starting.
- Read the troubleshooting, safety and final-test sections as well as the removal steps.
- Decide in advance when you will stop and use a professional repairer.
Samsung UK says its Self-Repair programme offers genuine parts for selected products, including Galaxy smartphones, tablets and laptops, and that manuals and guides can be located by model code or product category. It also says that damage caused by an attempted repair outside a Samsung Authorised Service Centre is not covered by warranty. Samsung’s UK self-repair information should therefore be checked before purchasing parts or relying on an assumed warranty outcome.
Samsung Self-Repair supported-device range — use official programme imagery only; support and materials vary by model and category.
Apple’s iPhone 13 manual provides another useful checklist model: safety information, quick checks, Apple Diagnostics for Self Service Repair, parts, screws, tools, repair videos and procedures sit alongside fault-specific guidance. Apple’s documentation does not make every repair suitable for every reader, but it demonstrates the documentation depth to seek.
General repair-guide libraries can help you understand terminology and compare procedures. iFixit describes its guides as step-by-step repair guides across many device categories. Use such material as supplementary context, while giving precedence to the exact manufacturer documentation and parts route available for your handset. iFixit Repair Guides can be a useful starting point for familiarisation.
Choose DIY Repair, Professional Repair or Replacement
AI-generated generic editorial illustration — not a retailer product photo and does not depict the reviewed product or service. Give readers a fast route-selection framework at the conclusion without implying that every fault is suitable for DIY repair.
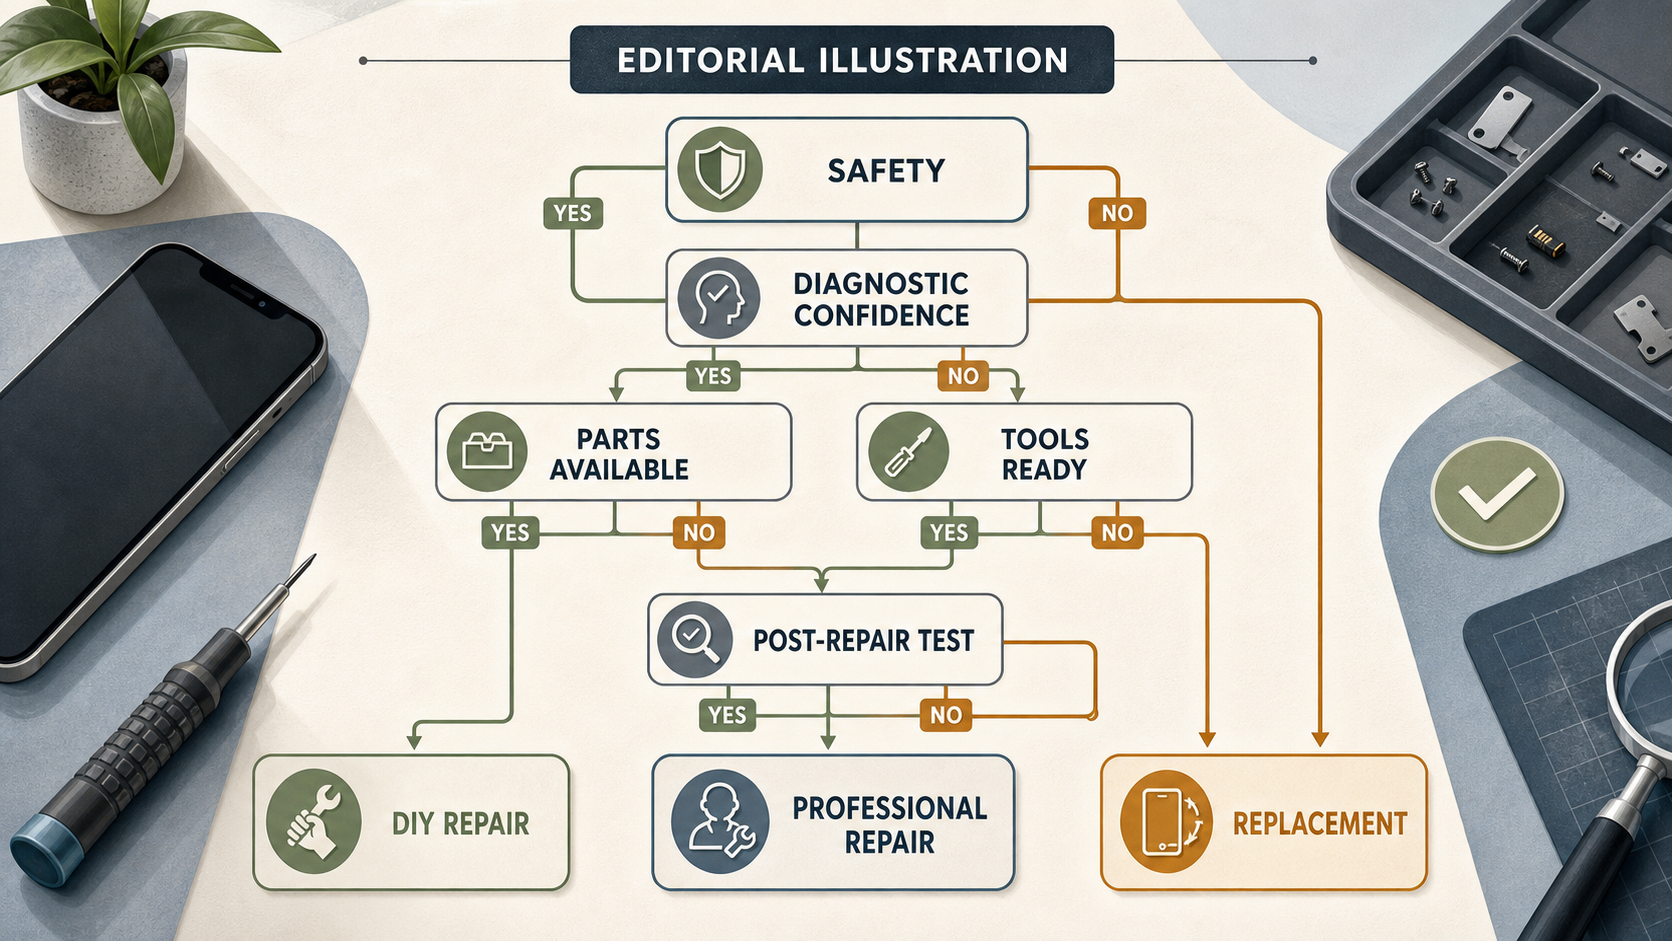 DIY is most defensible when the fault is reasonably clear, the exact model has a documented route, appropriate parts and tools are available, you can follow the relevant safety guidance, and you have a realistic post-repair test plan. A cracked screen with a clear, supported procedure may fit that route; a battery or charging problem with uncertain cause often needs more caution.
Choose professional repair when diagnosis is incomplete, there is swelling, liquid or structural damage, the repair requires equipment you lack, or failure could leave critical functions unverified. Ask the repairer what diagnosis they have made, which part they intend to use, and which functions they test after the work.
Choose replacement when the total likely repair cost and uncertainty no longer offer good value against the device’s remaining useful life. Consider data transfer, security updates, condition beyond the reported fault and the value of a refurbished alternative, rather than deciding solely from a single component price.
Editorial illustration: use it to compare diagnosis, safety, parts, tools and post-repair confidence before selecting a route.
The conservative rule is simple: if you cannot verify diagnosis, documentation, suitable parts or final testing, pause. The right repair decision is the one that reduces avoidable risk, not the one that appears cheapest at the outset.
Explore your repair-support options
Frequently Asked Questions
How do I know whether my phone supports a documented self-repair route?
Search using the exact model code on the manufacturer’s support site and look for a repair manual, compatible parts, tools and procedure—not merely a product-family page. Samsung UK says its Self-Repair offer applies to some products and provides model or category routes to manuals and guides. Check availability before buying anything. Samsung Self-Repair
Is it safe to replace a phone battery myself?
It may be suitable only where the device has a documented procedure, you can follow the relevant safety instructions and the battery shows no damage or swelling. Apple includes dedicated battery safety and battery, charging and power guidance in its repair manual. If the battery is swollen, hot, punctured or the diagnosis is uncertain, stop and seek professional help. Apple’s repair manual
Why is my phone still not charging after I have cleaned the charging port?
The cause may not be debris. Try known-good accessories and consider battery, software or internal power issues as well as connector damage. Apple’s documentation places wired charging and power issues within a wider troubleshooting and diagnostics area, which is why persistent faults should not automatically lead to a port replacement. Apple’s charging and power guidance
What should I test after replacing a screen, battery or charging port?
Test the function you repaired and the functions affected by disassembly. For a screen, check image quality and touch; for a battery, check normal charging and power behaviour; for a port, check stable charging and relevant data functions. Then check cameras, sound, buttons and connectivity as appropriate for the model. Use the manufacturer’s listed post-repair diagnostics or checks where available.
Related reading
- Apple vs Samsung self-repair: parts, manuals, tools, diagnostics and practical limits for UK phone owners
- Samsung Galaxy self-repair review: supported repairs, genuine parts, diagnostics and warranty boundaries
- Fairphone repairability review: modular parts, repair guides, tool needs and practical limitations
- How to check genuine phone parts, repair manuals, warranty boundaries and post-repair diagnostics before paying
Editorial information: About our editorial team · Read our editorial policy · Read our affiliate disclosure.